Your blog can increase its ad revenue, improve the quality of ads it runs on the website, and help you better with ad targeting, simply just by setting up Ads.txt.
Ads.txt is a text file that website owners can create to declare who is authorized to sell their ad inventory. This file helps to prevent domain fraud and inventory misrepresentation and ultimately protects both publishers and advertisers.
My personal experience of setting up ads.txt spans over 7 websites, all of which showed a boost of improvement in ad quality and ad revenue the moment they were successfully set up.
In this guide, I will show you the RIGHT and EASY way that I always use to help you swiftly set up Ads.txt in Ezoic for your website.

Table of Contents
What Is Ads.txt?
In Ads.txt, ADS stands for Authorized Digital Sellers.
Ads.txt is a text file (in .txt format) on your website that includes all digital sellers that are allowed to run advertisements on your website and sell their products or services.
This will restrict only sellers mentioned in the ads.txt to be authorized to sell advertisements on your website.
What Is An Ads.txt Manager?
An ads.txt manager is a free and helpful tool that allows easy management and maintenance of your ads.txt file on the website.
With ads.txt manager, you can update the digital sellers’ records easily and keep your ads fresh and secure from unauthorized sellers.
Why Do I Need an Ads.txt Manager?
If you want to run ads on your website, you need to have an ads.txt file. This file tells ad networks what ads are allowed to run on your site.
Without an ads.txt file, ad networks will not be able to serve ads on your site. If you want to change your ads.txt settings, you need to use an ads.txt manager.
For example, if you want to add or remove ad networks from your ads.txt file, you need to use an ads.txt manager.
Now that you know the basics of ads.txt, let’s head right into how to set up ads.txt for the first time.
We’ll show you three ways you can do this, with a step-by-step approach.
Method 1: How To Set Up Ads.txt In Ezoic Manually
To start setting up your ads.txt file on the website, you will need two things.
First, an Ezoic-approved website.
Second, an account on Ads.txt Manager.
Step 1: Creating An Account On Ads.txt Manager
Creating an account on Ads.txt Manager is free and easy.
To get started, visit www.adstxtmanager.com or click here.
On the homepage, click on Get Started Now to visit the registration page.

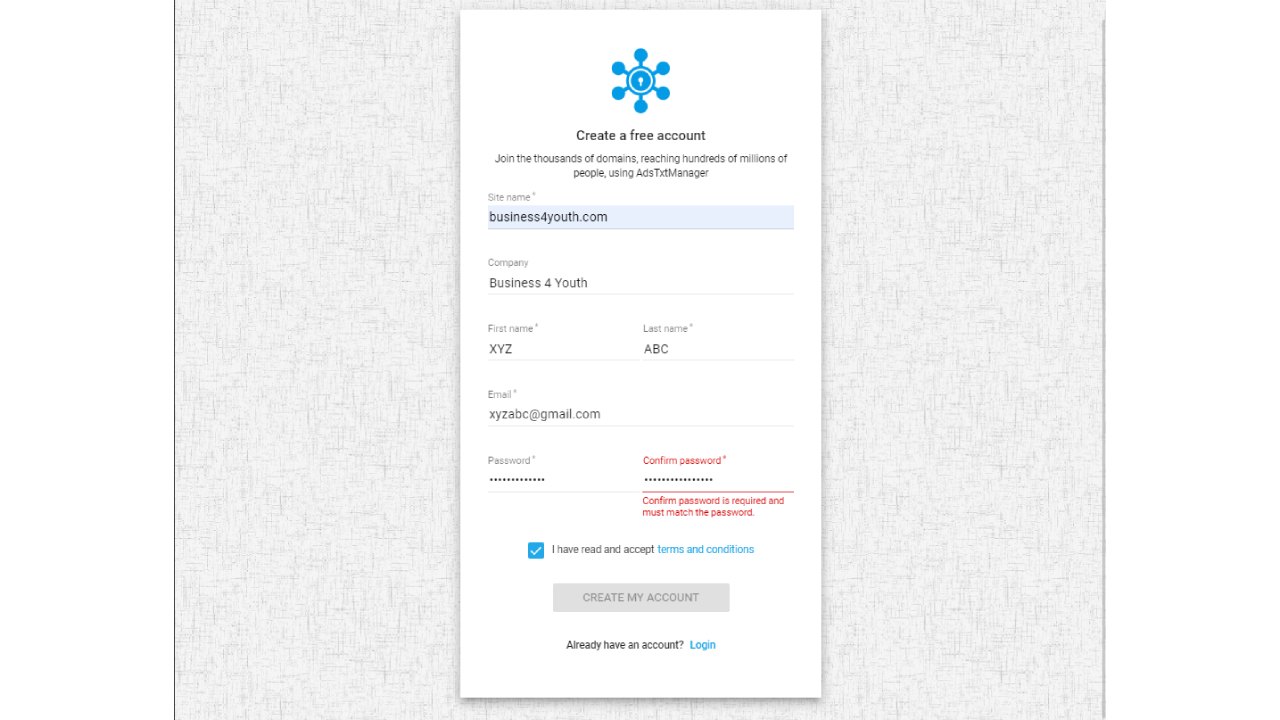
On the Register page, you will see a form you need to fill out.
In the respective fields, type in your site name, your email, set a password, your name, and your company name.

Once everything is filled out, check the Terms and Conditions box and click on Create My Account.
This will created for you an account in Ads.txt Manager.
Step 2: Setting Up Ads.txt using Ads.txt Manager
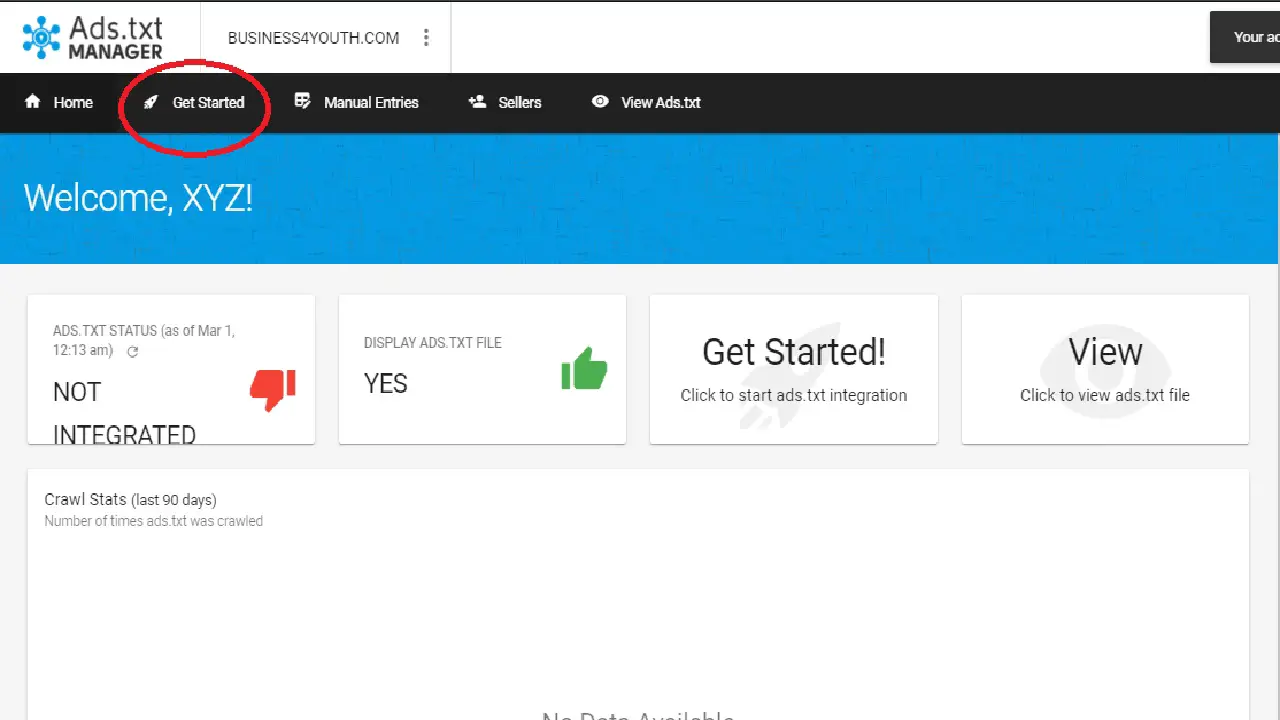
Now, using the credentials you registered your account with, log into your account on Ads.txt manager.
This will open up a new page for you with the option of Get Started. Click on that.

Now you’ll be seeing information relating to ads.txt. If you don’t know much, you can choose to read it.
Once you’re done, click Next.
Step 3: Authorize
Now the Authorize tab will open.
Here, you will need to scroll down and look for Ezoic. If you’re also Google Adsense approved, you can also check Adsense in this section.

Once checked, authorize your approved Ads services by going back up and clicking Next.
Step 4: Import
Now you will see the Import tab. This enables you to import the ads.txt file to your Ads.txt manager.
If you already have an Ads.txt file, click on Import ads.txt, scroll down and click Next.

Step 5: Redirect
In the Redirect tab, you will be integrating your Ads.txt Manager data with Ezoic.
To get started, select and copy the Account ID shown here.

Step 6: Ezoic Integration
Now head on to your Ezoic Dashboard and follow these steps.
Go to the Monetization tab, scroll down to Ads.txt settings, and click on Manual Setup.
This should open the Ads.txt manager settings in Ezoic.
The Instructions tab will guide you through the basic procedure. If you’re following our steps, you can skip reading that and simply click on Next.
The next tab is Ads.txt Manager.
Here you will paste the Account ID you copied before on the Ads.txt Manager website.
In the section below, select your domain and click on Save.

The next tab is Setup Redirect.
Here you will turn on Ads.txt Manager and click on Verify.

If you’ve followed all the steps properly up till now, the Verification tab will show a green indicator reading Status Complete.
If not, wait for a few minutes. The integration can take some time. After a little click, try clicking verify again.

If it still shows up an error, this means you have made a mistake following the steps. Go through them again and see for yourself.
When the verification is completed in Ezoic, head back to Adstxt Manager.
Step 7: Validate
On the Adstxt Manager website, you should see the last tab open now.
In the Validate tab, click on Re-validate Site. If you have followed all the steps properly up till now and the verification was successful in Ezoic, the Adstxt Manager should be integrated as well.
If everything is done correctly, you will see the words INTEGRATED in the box.
Step 8: Rechecking
Your ads.txt file is set up now. This step is just to view the file from your website.
To check the ads.txt file on your website, go to [domain_name].com/ads.txt.
This will display your ads.txt file. Here’s a sample ads.txt file to show you what it will look like:

Voila! You’ve successfully set up your Ads.txt file manually using Adstxt Manager.
Now let’s see how you can automate this process in Ezoic.
How To Set Up Ads.txt in Ezoic Automatically
This is an easier and more automated version of setting up your ads.txt file.
Let’s dive right in!
Step 1: Setup
Head on to your Ezoic Dashboard and go to the Monetization tab.
From here, scroll below to the Ads.txt Section.
In this section, click on Automatic Setup.
Step 2: Creating An Ads.txt Manager Account
Now click on Create. This will automatically create an Ads.txt manager account for you without asking you to fill in any details.
Once done, scroll down and click Next.
Step 3: Adding Google AdSense (Optional)
If you’re also authorized with Google AdSense, in the Edit Entries tab, click on Add A Network.
From here you can add your Google AdSense account to the ads.txt file.
Once done, click Next.
Step 4: Verification
In the last section of Ads.txt Setup, select your domain and click on Verify.
If you’ve followed the steps correctly up till now, the integration should be successful and you will be notified with a green coloured Status Complete text shown.
If everything looks fine, click on Done and close the ads.txt settings.
Method 3: Setting Up Ads.txt Using A Plugin
The last method of setting up your Ads.txt file is by using a WordPress Plugin.
This method is not recommended as plugins slow websites down, however, if you still want to go with this option, here’s how to set up your Ezoic ads.txt file using a WordPress plugin.
Step 1: Account ID
The first step will be to grab your Account ID from Ads.txt Manager.
Go to adstxtmanager.com and log in to your account.
If you haven’t registered, click on Get Started and create an account.
Once logged in, click on the Menu option in the top right corner. This should show your Account ID.
Select and copy the Account ID shown here.
Step 2: Installing The Ads.txt Manager Plugin
Once copied, go to your WordPress Admin Dashboard and head on to the Plugins section.
Click on Add New.
Now search for Ads.txt Manager. This should show the Ads.txt Manager plugin.

Click on Install, and once done, click on Activate.
Step 3: Ads.txt Manager Settings
Once the plugin is activated, you can access the settings through Settings > Ads.txt Manager Settings.
On the settings page, all that’s left is to paste the Account ID you copied before and press Save.

That’s all! Your ads.txt file should work perfectly now!
If you want to check it on your website, head on to [domain_name}.com/ads.txt.
Which Is The Best Method For Setting Up Ads.txt?
All three methods mentioned above work perfectly.
The most recommended method, however, is the second one: Setting up Ads.txt automatically.
The first method, manual set-up, makes the user more prone to error.
The third method, WordPress Plugin, brings an additional plugin to your website.
Remember, the fewer plugins on a website, the better.

