If you want your blog’s earnings to be boosted, you NEED to set up Ezoic Monetization as soon as possible and see your potential earnings come to life!
AdSense alone just isn’t enough. Speaking from personal experience, Ezoic integration on average increases your ad revenue earnings by around 30-50%.
Setting up Ezoic Monetization isn’t too complicated, however, there is a right way to help you get close to the boosting benchmark in minimal time.
Personally, this blog enjoyed a 130% increase in revenue after Ezoic Integration!

If you have a website that is approved with Google AdSense, this guide is for you.
In this guide, I will show you how to get registered with Ezoic using your website and Google AdSense data.
Ezoic Integration is highly recommended for blogs or website owners who rely primarily on ad revenue from their websites.
Enough teasing- let’s get started with the registration!
Table of Contents
How To Sign Up For Ezoic
The first step to start signing up would be to create an account in Ezoic.
Visit https://pubdash.ezoic.com/join or click here to get started.
Here, enter your email. This email will be used for login purposes and for communication purposes by Ezoic.

Once that is done, enter your website’s domain name in the section shown.

Now click on Continue.
Once you click continue, Ezoic will check if your website meets the Ezoic Requirements for monetization.
If your website gets less than 10,000 visits a month, you will only be eligible for the Ezoic Access Program (helps boost site speed, not an ad manager).
If you do meet the Ezoic requirements, you can continue for purposes of ad monetization.
If you’re confused about Ezoic requirements, check our extensive guide on Ezoic Requirements and How To Qualify Them.
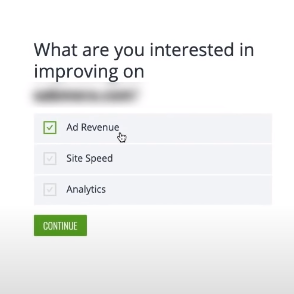
Now, you will be faced with a question asking you what you’ll use Ezoic for. Check on Ad Revenue.

If you wish to improve your site speed as well, check out our article on boosting site speed using Ezoic Leap.
Congratulations! Your sign up is complete. A similar message will be shown on your screen now.

The next step is to set up Ezoic with your website. To continue with that, click on Get Started.
Setting Up Ezoic Monetization
You’re done with signing up. Now comes the time to set up your Ezoic account with your website.
Don’t worry, through a step by step approach I will try my best to guide you through the process easily and efficiently.
Step 1: Complete Account Set Up
To finish setting up your Ezoic account, enter your first name, last name, and password in the fields shown.

The password needs to be at least 10 characters long with at least one special character, number, lower case character, and upper case character.
Now press Save.
You’ll see a pie chart in the top right corner of the page that will show your progress. After pressing save, it should show 33% complete.
Step 2: Integrating Website With Ezoic
In this step, you will be conducting some technical work so make sure you follow the steps carefully.
What you’ll be doing in this step is changing your domain’s name servers to Ezoic’s servers which will help Ezoic function on your website and help improve SEO, monetization, speed, and more.

To start the process, click on Select.
Note: Changing your website’s name servers will not pause your website. Your site should run without any interruptions throughout the whole process.
Now you’ll be seeing two columns of name servers. The Current Name Servers will be showing the name servers your domain already has while the Change Name Servers To column will show the name servers you need to replace the existing ones to.

To do this, go to your website’s hosting platform. Here, we will show you the process for a website’s domain bought from GoDaddy.
How To Change Name Servers On A GoDaddy Domain
Log in to your GoDaddy account and go to My Account.
In the section of Domains, click on the three dots shown in the top right corner of your website’s name. Now click Manage DNS.

Now you will see a section of Name Servers and an option to change them at the top. Click on Change.

For each current server name, copy the respective server name that Ezoic showed you in the column of Change Name Servers To.

Now press Save.
Now go back to the Ezoic page and press on Integration Complete.
Ezoic may take 15-20 minutes to recognize the change in Name Servers so don’t worry if they don’t change right away and you’re shown an Incomplete message.
While you’re waiting for the change to take place, feel free to get on the next steps of setting up.
Step 3: Setting Up Ad Testing
In this final step, you will be setting up ads for your website using Ezoic.
This step is quite extensive and is divided into five sections: Google Ad Exchange, Placeholders, Ads.txt, Turn Traffic On, and Ezoic Review.

We’ll go through each step one by one.
Google Ad Exchange
This step connects your Google AdSense with Ezoic to help you with better ad monetization and revenue.
In the field shown below, enter the email you used to register for Google AdSense.
Now press Resend Link.
In 20-30 minutes, you will receive a form from Google on the email you entered.
While you wait for the form, feel free to move on to the next steps.
Soon, you will receive an email from Google AdSense redirecting you to a form.

The form will look like this:

Enter all the details accurately that the form asks for and press Submit.
Placeholders
The placeholders feature will place Ezoic ads on your website to run ad testing. Nothing will be permanent as of now so don’t worry.
Click on Placeholders, and then on Get Started.
Now, Ezoic will guide you through the process of placing ads on your website.
The simplest way to complete this process is to press Next repeatedly and when it asks if you’re running ads on the website, press Yes.

Now choose the Ad Partner your website works with and press Next.

Now press on Have Ezoic Remove Current Ad Code if you want Ezoic to automatically place testing ads on your website or press on I’ll Do It to do it manually.

You will need to place at least 10 ads to be done with this step.
Once done, press on Next.
Now Ezoic will ask how you would like to set up placeholders. Either use a Google Extension for this task (the easy way) or do it manually by pressing I’ll Do It.

Ads.txt
Ads.txt is a file used on websites that informs ad partners on what resellers can publish ads on your website. Integrating ads.txt is a fairly easy task but requires enough steps to have a separate guide for it.
But don’t worry, we already have that guide for you: How To Set Up Ads.txt In Ezoic.
Turn Traffic On
This step will ask you to allocate the percentage of ads you want Ezoic to publish on your website in comparison with your other ad partner (Google AdSense).
There will be separate bars for different platforms.

It is recommended to keep all bars at 90%. This will help Ezoic understand your website better and ultimately help you in return with its AI processing to generate more ad revenue for you.
Ezoic Review
The last step for setting up, Ezoic Review ensures your website meets all the Ezoic Requirements.
If you’re confused about Ezoic Requirements, want to know what they are and how to qualify for them, check out our guide on Ezoic Requirements For Monetization And How To Qualify Them.
Congratulations! You’ve completed all the processes!
You should soon see a massive increase in your ad revenue now using Ezoic.
On the other hand, are you worried about your site speed? Did you know that site speed is the most influential factor for a high bounce rate and low Google SERP rankings?

Now that you’re integrated with Ezoic, why not head on to our Ezoic Leap guide and see how you can increase your website speed to get better Google rankings?

